Scratch a dog and you’ll find a permanent job.
– Franklin P. Jones
This is my first script for provisioning the Glue Crawler Resources on AWS.
The important resources that need to be created while provisioning resources in Glue. In this post, I am taking a use case that will create the Data Catalog based on various source datasets.
1. IAM Role
STEP-1: Adding a new Glue Service role for a developer, e.g. “dev_AWSGlueServiceRole“
resource "aws_iam_role" "glueRole" {
  name = "dev_AWSGlueServiceRole"
  assume_role_policy = <<EOF
{
  "Version": "2012-10-17",
  "Statement": [
    {
      "Action": "sts:AssumeRole",
      "Principal": {
        "Service": "glue.amazonaws.com"
      },
      "Effect": "Allow",
      "Sid": ""
    }
  ]
}
EOF
}
STEP-2: Attaching the AWS managed pre-defined policy “AWSGlueServiceRole” to the role created above “dev_AWSGlueServiceRole“.
resource "aws_iam_role_policy_attachment" "glue_service" {
    role = "${aws_iam_role.glueRole.id}"
    policy_arn = "arn:aws:iam::aws:policy/service-role/AWSGlueServiceRole"
}
STEP-3: Finally, as my crawler looking for data at the source location on an S3 Bucket for e.g(dev_source_data“), we need to define a policy and the Glue role to the bucket.
resource "aws_iam_role_policy" "dev_glue_s3_policy" {
  name = "dev_glue_s3_policy"
  role = "${aws_iam_role.glueRole.id}"
  policy = <<EOF
{
  "Version": "2012-10-17",
  "Statement": [
    {
      "Effect": "Allow",
      "Action": [
        "s3:*"
      ],
      "Resource": [
        "arn:aws:s3:::dev_source_data",
        "arn:aws:s3:::dev_source_data/*"
      ]
    }
  ]
}
EOF
}
2. Data Catalogs
resource "aws_glue_catalog_table" "aws_glue_catalog_table" {
  name = "mytable"
  database_name = aws_glue_catalog_database.aws_glue_catalog_database.name

  table_type = "EXTERNAL_TABLE"
  parameters = {
    "classification" = "json"
  }
  storage_descriptor {
    location      = "s3://mybucket/myprefix"
    input_format  = "org.apache.hadoop.mapred.TextInputFormat"
    output_format = "org.apache.hadoop.hive.ql.io.HiveIgnoreKeyTextOutputFormat"

  ser_de_info {
    name = "myserdeinfo"
      serialization_library = "org.openx.data.jsonserde.JsonSerDe"
      parameters = {
        "paths" = "jsonrootname"
      }
    }

    columns {
      name    = "column1"
      type    = "array<struct<resourcearn:string,tags:array<struct<key:string,value:string>>>>"
    }
  }
  partition_keys {
    name    = "part1"
    type    = "string"
  }
  partition_keys {
    name    = "part2"
    type    = "string"
  }
}
3. Glue Crawler
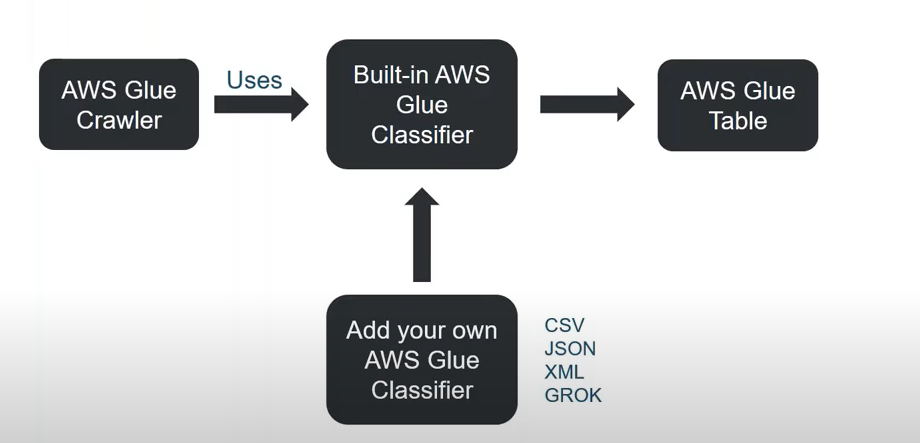
Before going to create the resources let me explain a bit about the crawlers.
A Crawler is a component that accesses various data stores and extracts the metadata and creates and manages table definitions in the AWS Glue Data Catalog. Same time it also manages the data partitions of the Glue tables based on the source data.
Sample Script to create a Glue Catalog Table, e.g. “aws_glue_catalog_table”.
resource "aws_glue_crawler" "events_crawler" {
  database_name = aws_glue_catalog_database.glue_database.name
  schedule      = "cron(0 1 * * ? *)"
  name          = "events_crawler_${var.environment_name}"
  role          = aws_iam_role.glue_role.arn
  tags          = var.tags

  configuration = jsonencode(
    {
      Grouping = {
        TableGroupingPolicy = "CombineCompatibleSchemas"
      }
      CrawlerOutput = {
        Partitions = { AddOrUpdateBehavior = "InheritFromTable" }
      }
      Version = 1
    }
  )

  s3_target {
    path = "s3://${aws_s3_bucket.data_lake_bucket.bucket}"
  }
}
4. Glue Triggers
We mostly encounter 3-types of scenarios to run the Glue Crawlers.
- Conditional Trigger (based on some job condition)
- On-Demand Trigger(adhoc or on-demand based running the cralwer)
- Scheduled Trigger(Scheduled to trigger on specific time of a day/week/month)
Apart from this, there are scenarios when the triggers can have both a crawler action and a crawler condition.
In the below example the crawler “cralwer_1” will execute and “cralwer_2″ will be executed on “success”.
resource "aws_glue_trigger" "conditional_trigger" {
  name = "example"
  type = "CONDITIONAL"

  actions {
    crawler_name = aws_glue_crawler.cralwer_1.name
  }

  predicate {
    conditions {
      job_name = aws_glue_job.cralwer_2.name
      state    = "SUCCEEDED"
    }
  }
}